


描述
SHARP 夏普原裝 GP2Y1014AU0F 空氣品質偵測套件組 送排線,電容,電阻套件
台灣智能感測科技官網, 購買 更多關於 GP2Y1010AU0F, GP2Y1014AU0F, PM-2.5, PM2.5, Sharp, 夏普, 灰塵感測器, 煙顆粒檢測模組, 空氣品質偵測, 粉塵, 的產品
SHARP 夏普原裝 GP2Y1014AU0F 空氣品質偵測 粉塵 灰塵感測器 煙顆粒檢測模組 取代已經停產的 GP2Y1010AU0F 含完整 Arduino 範例
GP2Y1010AU0F 已經於 2014年停產版本, 市面上現有流通的庫存品, 最新版本是 GP2Y1014AU0F , 夏普光學灰塵感測器( GP2Y1014AU0F )在檢測非常細的顆粒,如香煙煙霧,是特別有效的,並且是常用的空氣淨化器系統。該裝置中,一個紅外發光二極體和光電電晶體,對角佈置成允許其檢測到在空氣中的灰塵反射光。該傳感器具有極低的電流消耗(最大20mA,11毫安培典型的),可以搭載高達7VDC的感測器。輸出的是一個類比電壓正比於所測得的粉塵濃度,敏感性為0.5V/0.1mg/m3。
日本夏普SHARP 原產灰塵感測器 GP2Y1014AU ,比上代GP2Y11010AU精度提高15%,在一致性上可以和PM2.5激光感測器對比.可測量0.8微米以上的微小粒子,感知煙草產生的煙氣和花粉,房屋粉塵等.體積小,重量輕,便於安裝.
主要參數
- 灰塵感測器GP2Y1014AU
- 靈敏度:0.5V/(0.1mg/m3)
- 輸出電壓(無灰塵): 0.9V(TYP)
- 消耗電流:11mA
GP2Y1014AU0F 是一款光學空氣品質感測器,設計用來感測空氣中的塵埃粒子,其內部對角安裝紅外線發光二極體和光電晶體,使其能夠探測空氣中塵埃反射光,即使非常細小的如煙草煙霧顆粒也能夠被檢測到,通常應用在空氣淨化系統中。

規格:
- 電源電壓:5-7V
- 消耗電流:20mA最大
- 最小粒子檢出值:0.8微米
- 靈敏度:0.5V/(0.1mg/m3)
- 清潔空氣中電壓:0.9V 典型值
- 工作溫度:-10~65℃
- 存儲溫度:-20~80℃
- 使用壽命:5年
- 尺寸大小:46mm×30mm×17.6mm
- 重量大小:15g
int measurePin = 0; //Connect dust sensor to Arduino A0 pin
int ledPower = 2; //Connect 3 led driver pins of dust sensor to Arduino D2int samplingTime = 280;
int deltaTime = 40;
int sleepTime = 9680;float voMeasured = 0;
float calcVoltage = 0;
float dustDensity = 0;void setup(){
Serial.begin(9600);
pinMode(ledPower,OUTPUT);
}void loop(){
digitalWrite(ledPower,LOW); // power on the LED
delayMicroseconds(samplingTime);voMeasured = analogRead(measurePin); // read the dust value

delayMicroseconds(deltaTime);
digitalWrite(ledPower,HIGH); // turn the LED off
delayMicroseconds(sleepTime);

// 0 - 5V mapped to 0 - 1023 integer values
// recover voltage
calcVoltage = voMeasured * (5.0 / 1024.0);

// linear eqaution taken from http://www.howmuchsnow.com/arduino/airquality/
// Chris Nafis (c) 2012
dustDensity = 0.17 * calcVoltage - 0.1;

Serial.print("Raw Signal Value (0-1023): ");
Serial.print(voMeasured);

Serial.print(" - Voltage: ");
Serial.print(calcVoltage);

Serial.print(" - Dust Density: ");
Serial.print(dustDensity * 1000); // 這裡將數值呈現改成較常用的單位( ug/m3 )
Serial.println(" ug/m3 ");
delay(1000);
}
GP2Y1014AU0F PM2.5 Optical Dust Density Sensor
- Features: Power supply voltage: 5-7V , Working temperature: -10-65 ? C , Consumption current: 20mA Maximum
- The smallest particles detected value: 0.8 m , Sensitivity: 0.5V / (0.1mg / m3) , Clean air voltage: 0.9V typ.
- Working temperature: -10 ~ 65 C , Storage temperature: -20 ~ 80 C , Size: 46mm ? 30mm ? 17.6mm
- It’s brand new, good quality & high performance. ** PLS PAY ATTENTION the accurate size & voltage rate before placing order in order to avoid buying wrong thing. Free Shipping & the deliver time to USA is approx. 10-18 days after the shipment date.
Introduction
I’m allergic to dust and I live in a fairly dry climate, so my lab accumulates dust at an amazing rate. I decided to look into the issue, by identifying where the hot-spots are and running a few experiments with humidifiers and logging the quantity of dust over time.
I came across the GP2Y1014AU0F PM2.5 module and I bought one for about $5. I didn’t know anything about it at the time of the purchase, so I didn’t know what to expect.
It says SHARP on the back and I may be wrong about this, but I have strong doubts that the ones you find on eBay are original. I say that because I noticed that the specs on the eBay page are slightly different than the specifications you find in the original Sharp datasheet, but that could be due to the seller not knowing his merchandise.
I was wondering wondering what it looks like inside, so I opened it.

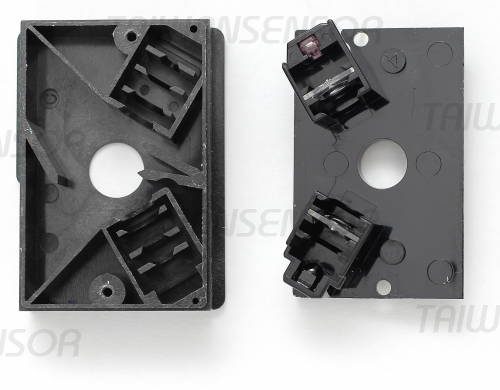
What I found was an IR LED and an IR detector, that are not facing each other, but instead they face the little hole in the middle. So what it basically does is that when you pulse the IR LED, it lights up the dust/smoke that goes through the hole and the detector picks it up. That signal gets amplified and is then presented on the Vo pin (pin 5).
The LED is driven by a PNP transistor, that has its base pulled up, so in order to turn it on, you have to pull its base to ground, via pin 3.
The sensitivity, which is basically the gain of the amplifier, can be adjusted from a small PCB potentiometer, which is exposed through a little hole in the case.
Wiring it up
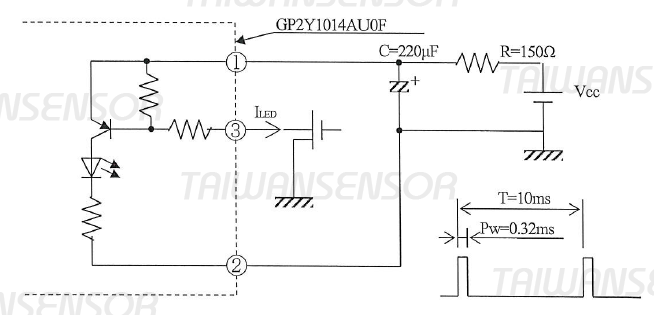
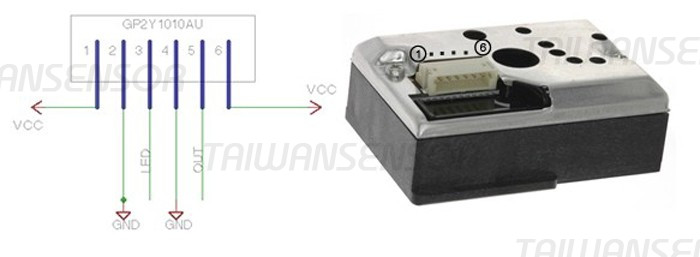
The one I got from eBay came with a 150 Ohm resistor and a 220 uF capacitor and the little diagram in the datasheet shows us how they’re meant to be connected.
It’s worth noting, that the capacitor is mandatory. If you don’t add it, it won’t work.
So, based on that diagram and the pin descriptions, we end up connecting them like this:

Getting information out of it
The following time constraints are specified:
| On time for the LED: | 320 µs |
| Sampling time after the LED is turned on: | 280 µs |
| Period: | 10 ms |
As you can see from the following screenshot, after 280 us, the signal is stable and ready for sampling. I believe the datasheet implies that you should sample for 40 us, because it recommends that the full on pulse should be 320 us ± 20 us, but once you sample the signal, there’s no point in keeping the LED on anymore, so what I take from that is that you should keep sampling it in order to obtain an average value.
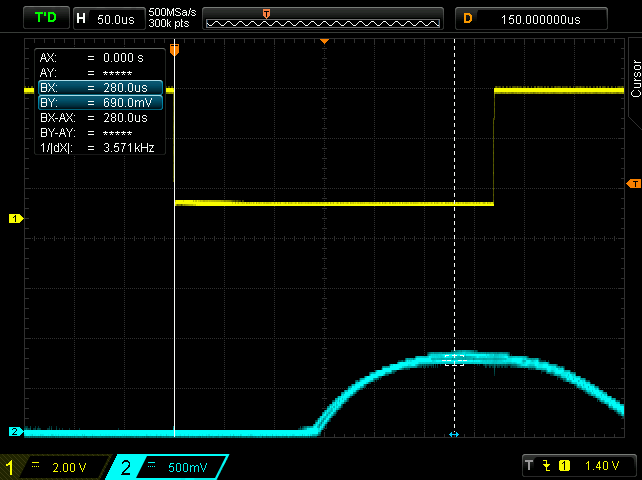
This means that we can get 100 readings per second, by taking the following steps:
- Pull pin 3 down.
- Wait for 280 us.
- Take readings and average them for the next 40 us.
- Release pin 3.
- Wait for 9.680 ms (10 ms – 320 us).
For reference, here’s what happens when dust gets through the sensor:

Interpreting the values
Turns out you can’t simply read the value from Vo (pin 5) and convert it into a quantity because the sensor has to be calibrated, by comparing it with an already calibrated instrument. If you don’t have that, you can still take relative measurements, but it’s utility is greatly diminished.
Needless to say, if you fiddle with the PCB potentiometer, the values you’ll get from Vo will change (both for detection and idle).
Conclusion
It’s cheap, but it seems to do what it promises. Its sensitivity is very low tho, considering other sensors can give a count of particles of much smaller sizes, but I suppose it could be used in situations where those sensors wouldn’t be appropriate (for example assessing smoke thickness, where this device would shine).
It would also be a good candidate for environments with a lot of dust, but I don’t know what it’s life time would be in such a place.
As I was saying, it’s cheap, it does what it promises and it has applications in environments where other sensors wouldn’t work, so it gets a thumbs up from me.


